It has been a long time since my last post. I have been too busy with moving house and had to leave for the hobby for several months. However I will still be updating the blog from time to time. I recently purchased this piece of driftwood and have planted it out with miniature bucephalandra species. Here is the tree before and after planting. I will be placing this tree in my nano to see how it looks as it grows out.
Wednesday, May 25, 2016
Wednesday, November 19, 2014
[1ft IWAGUMI] Equilibrium reached
Just a quick update on my nano aquarium.
It seems to have reached an equilibrium and is in need of a trim. A few things:
- HC is growing very well under the Comboray LEDs 3+cm high
- Mini pellia is suffering a little with BBA
- Pogo helferi is being overtaken by the HC
- All plants seem to be responding well
Overall quite happy with the progress but it does need some maintenance
It seems to have reached an equilibrium and is in need of a trim. A few things:
- HC is growing very well under the Comboray LEDs 3+cm high
- Mini pellia is suffering a little with BBA
- Pogo helferi is being overtaken by the HC
- All plants seem to be responding well
Overall quite happy with the progress but it does need some maintenance
Friday, September 26, 2014
[EHEIM OPAL] Sandy Paradise Aquascape
The time comes when for no reason you decide to turn your tank into a muddy mess and do some back breaking heavy lifting and mud siphoning.
Then comes the endless waves of anxiety as you pull out plant after plant and rescue the fish for the inevitable Armageddon that lies ahead.
Here is a list of items that I purchased
- About 20kg of Seiryu/Yingshi rock
- Bag of La Plata Sand
- Bag of Caribsea Rio Grande
- Bag of River Sand
- Driftwood
I love looking at white sandy beaches so I wanted to do something that would remind me of the Isle of Pines. Here are a couple of photos.
Then comes the endless waves of anxiety as you pull out plant after plant and rescue the fish for the inevitable Armageddon that lies ahead.
Here is a list of items that I purchased
- About 20kg of Seiryu/Yingshi rock
- Bag of La Plata Sand
- Bag of Caribsea Rio Grande
- Bag of River Sand
- Driftwood
I love looking at white sandy beaches so I wanted to do something that would remind me of the Isle of Pines. Here are a couple of photos.
Rocks to be used in the scape
Pre-Sand Layout
La Plata Sand added
Experimenting with sand colour tone
Full Tank Shot
Water Filled
[1ft IWAGUMI] Algae War Over. Aquascape photo
It has been a hard battle for my nano. The 3 day blackout did not help and killed all my HC but the water changes did seem to help a little.
I dont know what exactly i did that destroyed the algae but here is a list of things i performed:
- Put in a few fish (pleco + cardinal tetra + darwin algae shrimp)
- Water change with water from my other aquarium
- KNO3 dosing
- Turned UP temp to 24 degrees
Sunday, August 24, 2014
[1ft IWAGUMI] Algae Battle Begins
Wow it has been a while since I have put up an update on the 1 foot Nano cube.
Sometimes i wonder if anyone actually reads my blog. If you are a regular to my blog please let me know as it gives me motivation to update it more often.
Since filling the nano I have been plagued with problems.
Here is a quick summary of the highlights:
Sometimes i wonder if anyone actually reads my blog. If you are a regular to my blog please let me know as it gives me motivation to update it more often.
Since filling the nano I have been plagued with problems.
Here is a quick summary of the highlights:
1. HC has finally rooted. time to fill
2. Tank filled at the beginning of August. I am very happy and excited. CO2 ordered and has arrived. Light put on a timer for 6 hours a day. Fingers crossed. Diatom battle incoming.
3. Outbreak of Rhizoclonium ( I believe that is what it is called). I tried nuking some of it with H202 in a 1mL syringe but ended up destroying the HC carpet on the right front corner of the tank. Now i resort to daily 50% water changes. I have also planted the back of the aquarium with fast growing stem plants. As of today (25/8/14) I am double dosing excel and adding 10ppm of KNO3 in an attempt to beat the algae infestation. To reach 10ppm I have added 20g of KNO3 powder to 500mL of water and mixed it into a bottle. I am dosing 10mL of this solution daily then as needed.
Saturday, July 12, 2014
VIDEO REVIEW COB VITAL WHITE AND AROWANA RED
Here the VIDEO REVIEW on the new COB series made by Illumagic. This review includes information on the Vital White and Arowana Red and also shows my aquarium in all its glory.
[Review] Illumagic's COB Vital White and Arowana Red
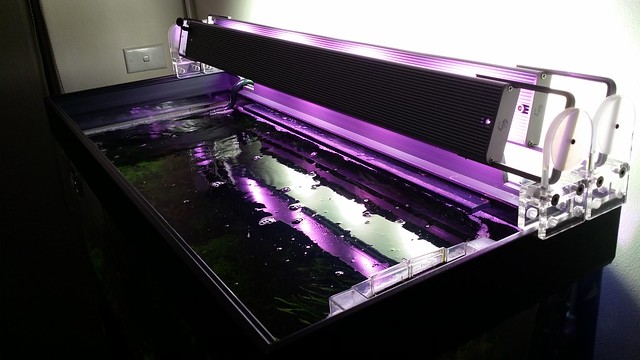
I have been wanting to replace the T5HOs on my Eheim Opal 100 for some time now. After some researching there is a model that has a very similar design to the Comboray and even uses identical Rotating Legs.
This light has not been officially released yet as it is new tech but I have been lucky enough to get my hands on a pre-ordered model last week Friday from Dalua. I believe that a there are a few pre-orders left but there is so little information about this light so I will be doing a quick review on it.
Description taken from Dalua
http://www.daluaaustralia.com.au/OurProducts/Illumagic.aspx
This light is VERY interesting but before we get into first here is a quick summary of its features:
- 4 x 10 watt Cree LED Clusters (Each LED approx 1 watt each)
- Each Cluster contains cool white, red, and green LEDs
- 60 degree optics with each LED
- 6500K Cool white
- 500nm to 620nm
- 872mm x 81mm x 25mm
- 40 watt power consumption
- plug and play
Unpacking and First impression
Delivery overnight and upon receiving the light I was happy with its packaging. Here are some unboxing pictures.
The main frame of the COB Vital White looks pretty much identical in shape from the top and sides as the Comboray Series. When Illumagic is onto a good thing they are sensible enough to stick to it. Again like the Comboray series the build quality of the aluminium frame is fantastic. Brushed aluminium curves; screws that fit perfectly, and a gliding aluminium rail that is not too tight or too loose. Perfect.
Next I move onto the modern looking rotatable mount. The main concern I had before i received the light was that if it would fit my 100cm long Eheim Opal. Illumagic has solved this problem by bringing in rails that extend outwards to fit larger aquariums. If it looks great, then there is no need to change it.
One problem is i wish those rails would lock into place somehow. This would prevent the light from sliding out when playing around with it above the aquarium (for larger aquariums).
In depth analysis
This light is very interesting. The three foot version is composed of 4 LED clusters. Each cluster has a mixture of 9 LEDs. The Vital White is made of 6x Cool White, 1x Red, 2x Cyan and 9 empty slots. It appears that Illumagic has done all the thinking for us and have arranged and chosen the ratios of the LEDs to optimally suit a freshwater setup.
Vital White COB Cluster
Arowana Red COB Cluster
Spectrum Analysis
Below is a comparison chart of the Vital White and a Photosynthesis Light Absorption Graph taken from the internet. The spectrum is indeed very close to perfect apart from a lot of green. I am suspecting the spike in the green spectrum are from the Cyan LEDs. The green really brings out the colour of plants but is not very useful for photosynthesis.
Now compare this with a graph of the photosynthetic spectrum of plants
The first thing that crossed my mind was why the cluster technology?
I may be wrong but it appears Illumagic has done this to reduce the shadowing effect and to allow better mixing of the different spectrums?
Light intensity and overall appearnce
The COB Vital White is very bright in intensity and produces a glorious shimmer effect inside the aquarium and out.
I would not recommend the COB Vital White by itself unless you just want a budget LED that grows plants. It definitely requires the COB Arowana red to even out the colour balance. Without the Arowana Red I found the COB Vital White too green for my taste.
With both lights combined, the plants look more vibrant and intense. There is minimal shadowing and the colour balance is dramatic. If I were very picky I would say the lights still lean a little too much on the green side.
One very cool feature I found was the ability to play with the Rotatable Stands. Rotating each stand allowed me to play with the foreground and background lighting of the tank. Tilting the background light away 30 degrees illuminated the background plants and the difference was immediately noticeable. The aquarium appeared to have more depth and had more character. Rotating both lights forward 30 degrees lit up the foreground plants and made the background appear shadowy and sinister. A very cool feature.
The COB Vital White combined with the COB Arowana Red is a high performance light for planted aquariums that I believe is able to grow the fussiest of plants by matching their photosynthetic needs. The lights are of quality build, versatile and fun to play with and can be adjusted via rotatable stands to bring out vivid and dramatic lighting that is difficult to achieve with standard T5HOs. If you want all the advantages of LEDs without the hassle or expense of making your own I would definitely consider the COB Vital White and Arowana Red.
The Good
- Great build Great Quality.
- Exceptional Performance. Plants responded very well.
- Very classy rotatable mounting stands. Interchangeable between the Comboray models.
- Extendable rails to fit larger aquariums that do not conform to the standard 90cm measurement
- Rotatable mount stands allow the user to play with lighting to focus on the background or foreground
The Bad
- Sliding rails don't lock into place and maybe could have been longer
- No channels to play around with
- No Day Night Setting
Sunday, June 29, 2014
[EHEIM OPAL] Small changes
Here is a quick update on the Eheim Opal.
I have planted the plants in rows emphasizing their difference in colours. Still think the left side needs some work so I will be replacing the Ludwigia with some more alternanthera mini and moving the Hygrophila to the back of the aquarium.
Since the increase in maintenace in this aquarium I have noticed a subtle improvement in the health of all the plants. Fertilisation currently used is EI. I also dose Seachem Flourish and every week and do regular small water changes to replace minor elements.
I have planted the plants in rows emphasizing their difference in colours. Still think the left side needs some work so I will be replacing the Ludwigia with some more alternanthera mini and moving the Hygrophila to the back of the aquarium.
Since the increase in maintenace in this aquarium I have noticed a subtle improvement in the health of all the plants. Fertilisation currently used is EI. I also dose Seachem Flourish and every week and do regular small water changes to replace minor elements.
Friday, June 20, 2014
Review: Illumagic COMBORAY 30cm
Here is my review on the Illumagic Comboray for 30cm
I am writing up this review because there seems to be no independent review on this light online. When choosing a LED light I had so many different lights to choose from.
For example here is a list of competitors:
1. Up aqua pro Z
2. Aqua zonic leds
3. Ista LEDs
4. Citii Aqua
5. Aware
6. Kessil
Why Comboray?
You may be wondering why i chose this light. After all, I did spent over $300AUD on this light and I could have easily chosen a Kessil instead. The DIY light build is approximately $200 if done right but requires a bit of time and effort. Basically it comes down to four reasons:
1. I wanted flexibility to switch and choose my LEDs
2. I wanted something guaranteed to grow a HC carpet
3. I wanted something that I could upgrade later on. (whether it is to marine or a larger tank).
4. It had low power consumption yet could grow HC to a depth of 1 inch
5. I wanted a light in which the internals could be upgraded later on easily as technology phases out
First impressions
First impressions were very good. I purchased this light from Dalua and it arrived via a courier. The light was packaged pre-assembled. The first thing i noticed was the way everything was packaged very neatly to avoid damage. The build quality of the light is fantastic. The light is thin and looks very durable without compromising its look. The aluminium housing has smooth curved edges and looks sleek. The screws fit perfectly and is not too tight or too loose. The sliding cover to the LEDs is sturdy and very clear. Everything just seems to fit into place without being too loose or tight. Even the rail slides in and out with minimal friction. Instructions are very simple and almost too simple (especially with the remote).
The remote control is small, light and quite thin. However it is made of plastic which was a little disappointing. It works out of the box. (I had to install the IR chip but it was very easy). There are three channels to the light. The first and second channels light up odd and even LEDs and can be dimmed separately. It even comes with a day night cycle programmed into it. Just hold the up button for 5 seconds and wait for the beep. The third channel seems to be reserved for something I have yet to figure it out.
I found the lens click into place and is quite easy to lever out using my fingernail. I was able to replace the 2x NW LEDs with CW LEDs easily without damaging the lens. The LEDs are held in by screws that you can loosen and you can easily slip a finger nail under the lens to click it out and push it into the desired lens.
What do you get?
I purchased the freshwater package $290 AUD with the Rotatable Mounting stand $50 AUD.
The package is advertised to come with the following:
6 X 2 watt Cree LED's
Neutral white, cool white, Blue, UV and cyan (green) 10,000k
LED's 390(UV) up to 500nm
300mm x 87mm x 25mm
12 Watt power consumption
90 Degree lenses
One power cord
Here is a more detailed description of what i got
8 X 2 watt Cree LEDs (2 x spare whites)
Illumagic ComboRay LED Bulb - Cyan (500nm) x 1
Illumagic ComboRay LED Bulb - UV (400nm) x 1
Illumagic ComboRay LED Bulb - Neutral White (4000K) x 4
Illumagic ComboRay LED Bulb - Cool White (7000K) x 2
IR Remote x 1 (battery included)
Power cord / pack with on/off switch
90 degree angle LED lens x 4
Default Stand
Thermopaste (not reusable as there is no lid)
Swivel Stand with silicon scratch protective covers(optional)
Here are some other Light Choices
● 400nm Near UV (SemiLEDs C-35L-U50)
● 420nm Violet (SemiLEDs C-35L-U70)
● 450nm Royal Blue (CREE Xlamp XT-E)
● 475nm Blue (CREE Xlamp XP-E)
● 500nm Cyan (SemiLEDs C-35L-C)
● 670nm Red (SemiLEDs C-35L-C?) - Yes it does. Dalua sells it.
● 5000~8300k Cool white (CREE Xlamp XP-G R5 139lm)
● 3700~5000k Neutral white (CREE Xlamp XP-G R3 122lm)
How well does it grow plants?
I am still testing this light but be sure to check back later.
In summary
The good
- Quality build
- Came pre-assembled
- Good value (when you factor in programmable remote)
- Quite bright (will test plant growth later)
- Easy to build with little fuss
- Day Night function with 2 separately dimmable channels
The bad
No real major disadvantages that i can think of:
- Instructions at times are too simple. The board to the remote is too close to the LEDs. Instructions should clearly give some warning about this.
- Remote is made of plastic. Appears a little flimsy.
Light choice
I have been doing a little research on light choices. Plants use a lot of the red and blue spectrum for photosynthesis. The blue penetrates water a lot better than the red but they also utilise red a lot more efficiently compared to the blue spectrum. Plants also use green but not very efficiently but the inclusion of cyan i believe is to bring out the green colour of plants as well as to balance out the red and blue spectrum. I also read somewhere that too much red can lead to algae issues and should be avoided. If I were to choose my own LEDs i would have probably gone with a similar setup to what was given to me. The only thing i would have done different is included a royal blue or violet instead of UV. The two cool white LEDs came in handy as the overall look of the light looked too much like sunlight without it.
Overall i consider this light a very good buy.
The more i use this light the more hidden functions i find.
Only the following months will tell how well it performs!
I am writing up this review because there seems to be no independent review on this light online. When choosing a LED light I had so many different lights to choose from.
For example here is a list of competitors:
1. Up aqua pro Z
2. Aqua zonic leds
3. Ista LEDs
4. Citii Aqua
5. Aware
6. Kessil
Why Comboray?
You may be wondering why i chose this light. After all, I did spent over $300AUD on this light and I could have easily chosen a Kessil instead. The DIY light build is approximately $200 if done right but requires a bit of time and effort. Basically it comes down to four reasons:
1. I wanted flexibility to switch and choose my LEDs
2. I wanted something guaranteed to grow a HC carpet
3. I wanted something that I could upgrade later on. (whether it is to marine or a larger tank).
4. It had low power consumption yet could grow HC to a depth of 1 inch
5. I wanted a light in which the internals could be upgraded later on easily as technology phases out
First impressions
First impressions were very good. I purchased this light from Dalua and it arrived via a courier. The light was packaged pre-assembled. The first thing i noticed was the way everything was packaged very neatly to avoid damage. The build quality of the light is fantastic. The light is thin and looks very durable without compromising its look. The aluminium housing has smooth curved edges and looks sleek. The screws fit perfectly and is not too tight or too loose. The sliding cover to the LEDs is sturdy and very clear. Everything just seems to fit into place without being too loose or tight. Even the rail slides in and out with minimal friction. Instructions are very simple and almost too simple (especially with the remote).
The remote control is small, light and quite thin. However it is made of plastic which was a little disappointing. It works out of the box. (I had to install the IR chip but it was very easy). There are three channels to the light. The first and second channels light up odd and even LEDs and can be dimmed separately. It even comes with a day night cycle programmed into it. Just hold the up button for 5 seconds and wait for the beep. The third channel seems to be reserved for something I have yet to figure it out.
I found the lens click into place and is quite easy to lever out using my fingernail. I was able to replace the 2x NW LEDs with CW LEDs easily without damaging the lens. The LEDs are held in by screws that you can loosen and you can easily slip a finger nail under the lens to click it out and push it into the desired lens.
What do you get?
I purchased the freshwater package $290 AUD with the Rotatable Mounting stand $50 AUD.
The package is advertised to come with the following:
6 X 2 watt Cree LED's
Neutral white, cool white, Blue, UV and cyan (green) 10,000k
LED's 390(UV) up to 500nm
300mm x 87mm x 25mm
12 Watt power consumption
90 Degree lenses
One power cord
Here is a more detailed description of what i got
8 X 2 watt Cree LEDs (2 x spare whites)
Illumagic ComboRay LED Bulb - Cyan (500nm) x 1
Illumagic ComboRay LED Bulb - UV (400nm) x 1
Illumagic ComboRay LED Bulb - Neutral White (4000K) x 4
Illumagic ComboRay LED Bulb - Cool White (7000K) x 2
IR Remote x 1 (battery included)
Power cord / pack with on/off switch
90 degree angle LED lens x 4
Default Stand
Thermopaste (not reusable as there is no lid)
Swivel Stand with silicon scratch protective covers(optional)
Here are some other Light Choices
● 400nm Near UV (SemiLEDs C-35L-U50)
● 420nm Violet (SemiLEDs C-35L-U70)
● 450nm Royal Blue (CREE Xlamp XT-E)
● 475nm Blue (CREE Xlamp XP-E)
● 500nm Cyan (SemiLEDs C-35L-C)
● 670nm Red (SemiLEDs C-35L-C?) - Yes it does. Dalua sells it.
● 5000~8300k Cool white (CREE Xlamp XP-G R5 139lm)
● 3700~5000k Neutral white (CREE Xlamp XP-G R3 122lm)
How well does it grow plants?
I am still testing this light but be sure to check back later.
In summary
The good
- Quality build
- Came pre-assembled
- Good value (when you factor in programmable remote)
- Quite bright (will test plant growth later)
- Easy to build with little fuss
- Day Night function with 2 separately dimmable channels
The bad
No real major disadvantages that i can think of:
- Instructions at times are too simple. The board to the remote is too close to the LEDs. Instructions should clearly give some warning about this.
- Remote is made of plastic. Appears a little flimsy.
Light choice
I have been doing a little research on light choices. Plants use a lot of the red and blue spectrum for photosynthesis. The blue penetrates water a lot better than the red but they also utilise red a lot more efficiently compared to the blue spectrum. Plants also use green but not very efficiently but the inclusion of cyan i believe is to bring out the green colour of plants as well as to balance out the red and blue spectrum. I also read somewhere that too much red can lead to algae issues and should be avoided. If I were to choose my own LEDs i would have probably gone with a similar setup to what was given to me. The only thing i would have done different is included a royal blue or violet instead of UV. The two cool white LEDs came in handy as the overall look of the light looked too much like sunlight without it.
Overall i consider this light a very good buy.
The more i use this light the more hidden functions i find.
Only the following months will tell how well it performs!
Thursday, June 12, 2014
[1ft IWAGUMI] update on scape
As you can see from the pictures below I did a lot of fiddling around to come to the final layout. Although i am not 100% happy with the final layout i believe it is good enough to start the fine layer of substrate. Here are a few quick tips that i learned.
1. Use the rule of thirds not only front on but also from the top
2. Sloping substrate greatly helps with depth
3. Try to make the rocks angle up
4. Include a focal point for the eyes to rest on
5. Fine layer capping helps improve look and grow HC
6. Use same type of rock
7. Rock should reach 2/4 height of the tank
Subscribe to:
Posts (Atom)